一、VMware
https://softwareupdate.vmware.com/cds/vmw-desktop/ws/
vmware激活密钥
1 、VMware 16密钥
ZF3RO-FHED2-M80TY-8QYGC-NPKYF
YF390-OHF8P-M81RQ-2DXQE-M2UT6
ZF71R-DMX85-08DQY-8YMNC-PPHV8
其他版本密钥:
2 、VMware 14密钥
CG54H-D8D0H-H8DHY-C6X7X-N2KG6
ZC3WK-AFXEK-488JP-A7MQX-XL8YF
AC5XK-0ZD4H-088HP-9NQZV-ZG2R4
ZC5XK-A6E0M-080XQ-04ZZG-YF08D
ZY5H0-D3Y8K-M89EZ-AYPEG-MYUA8
3 、VMware 15密钥
UY758-0RXEQ-M81WP-8ZM7Z-Y3HDA
VF750-4MX5Q-488DQ-9WZE9-ZY2D6
UU54R-FVD91-488PP-7NNGC-ZFAX6
YC74H-FGF92-081VZ-R5QNG-P6RY4
YC34H-6WWDK-085MQ-JYPNX-NZRA2
4 、VMware 17密钥
MC60H-DWHD5-H80U9-6V85M-8280D
二、ubantu
https://blog.csdn.net/m0_51913750/article/details/131604868
三、docker
安装docker
apt install docker-ce
docker拉取镜像遇到的问题:
1.把/etc/docker/daemon.json添加了阿里镜像仓库地址之后还是无法运行命令
shelldocker run hello-world
提示:
docker: Error response from daemon: Get "https://registry-1.docker.io/v2/": net/http: request canceled while waiting for connection (Client.Timeout exceeded while awaiting headers).
操作:nano /etc/resolv.conf 添加了以下设置,但是并没有什么软用
nameserver 8.8.4.4

nameserver localdomain
后来查询资料说是改为阿里的镜像仓库就能用,然鹅还是没软用,最后换了别的镜像才解决问题
sudo mkdir -p /etc/docker
sudo tee /etc/docker/daemon.json <<-'EOF'
{
    "registry-mirrors": [
    	"https://dockerpull.com",
        "https://docker.anyhub.us.kg",
        "https://dockerhub.jobcher.com",
        "https://dockerhub.icu",
        "https://docker.awsl9527.cn"
    ]
}
EOF
sudo systemctl daemon-reload && sudo systemctl restart docker
镜像仓库地址:https://www.cnblogs.com/alex-oos/p/18417200
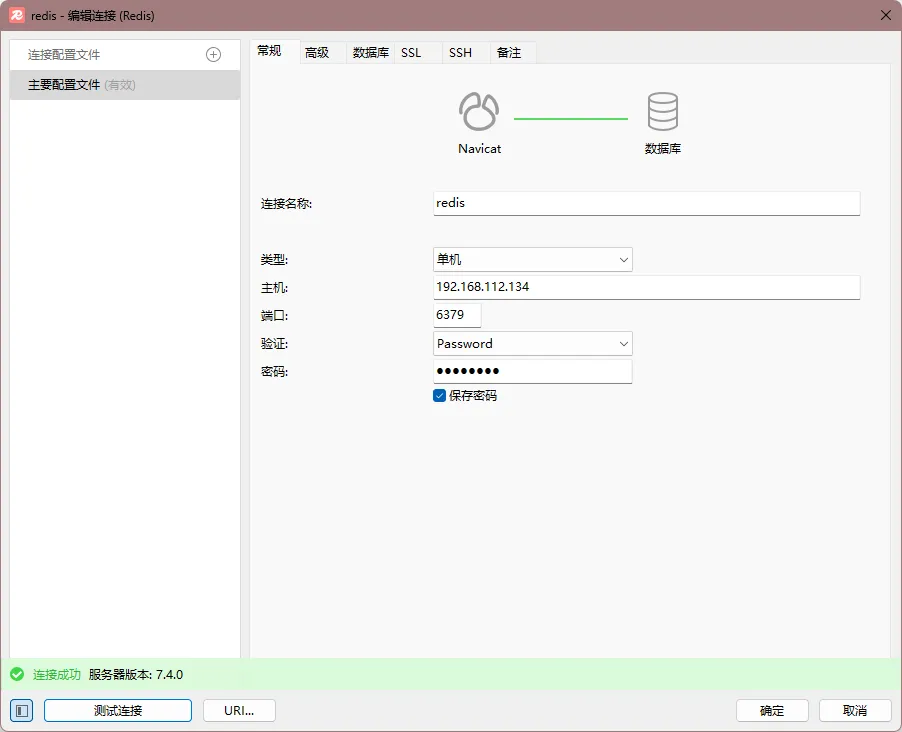
docker run -d --privileged=true --restart=always --name redis -p 6379:6379 \
-v /home/cq/otherSoft/redis/conf:/etc/redis \
-v /home/cq/otherSoft/redis/data:/data \
-v /etc/localtime:/etc/localtime redis redis-server /etc/redis/redis.conf
成功安装redis之后,发现用localhost连接不上,后面发现得用虚拟机的ip才能连上 成功连接:
GitToolBoX 展示提交记录

restfultool-fix 快速搜索接口

jrebel 热部署 教程 注释:部分提前加载的静态变量可能无法生效 如:alibaba的fastJson的paseObject功能,解决方法参考:解决JRebel进行代码热加载时FastJson的JsonField的缓存无法刷新问题
java@RestController
@RequestMapping("/api")
public class SystemController {
    @ApiOperation(value = "开发时清除缓存", notes = "用于开发使用JRebel时清除FastJson的对象解析Cache")
    @RequestMapping(value = "/clearCache", method = RequestMethod.GET)
    public String clearCache() {
        SerializeConfig.getGlobalInstance().clearSerializers();
        ParserConfig.getGlobalInstance().clearDeserializers();
        return "";
    }
}
或者
java//可以在开发环境,禁用ASM
SerializeConfig.getGlobalInstance().setAsmEnable(false);
show comment 展示注释
原文:https://juejin.cn/post/6996976545784922119
Arthas:
第一步:加依赖一键启动
arthas下载地址(一键启动不用下载):https://arthas.aliyun.com/arthas-boot.jar
xml		<dependency>
			<groupId>com.taobao.arthas</groupId>
			<artifactId>arthas-spring-boot-starter</artifactId>
			<version>3.7.1</version>
		</dependency>
第二步:启动项目
第三步:进arthas终端:http://127.0.0.1:8563/
第四步:复制执行命令:
vmtool -x 3 --action getInstances --className com.differ.jackyun.oms.controller.TestControl --express 'instances[0].get(" ")'
最后执行即可
java相关命令tip:
jps 查看所有java进程
taskkill /f /pid pid 杀死java进程
JRebel:
先下2022.4.1的jrebel版本:https://plugins.jetbrains.com/plugin/4441-jrebel-and-xrebel/versions
激活地址:https://jrebel.qekang.com/ 新地址:https://www.jpy.wang/page/jrebel.html
idea 激活地址:https://3.jetbra.in/